

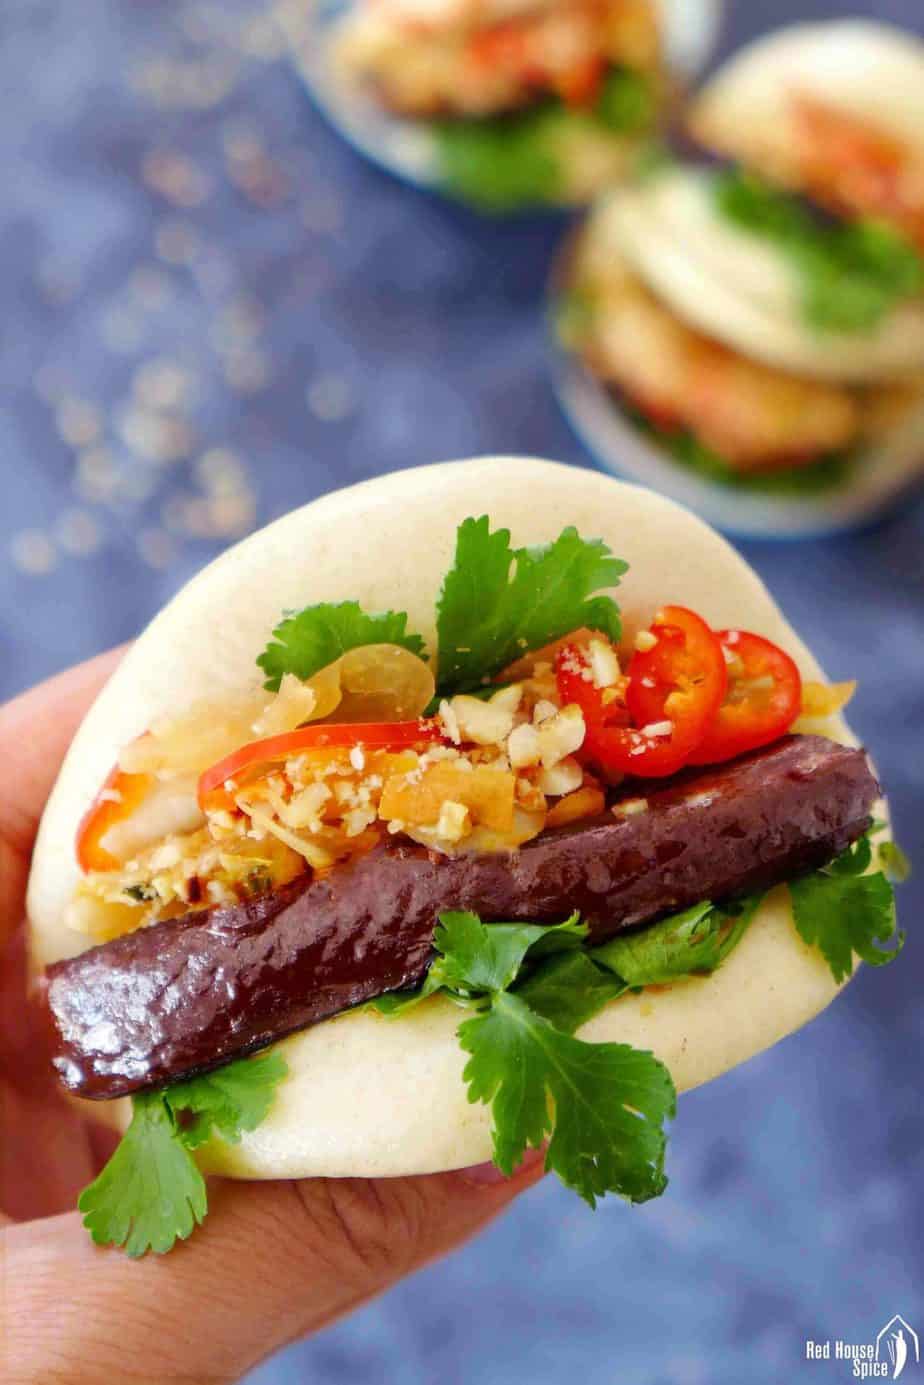
Tender pork belly sandwiched in a fluffy steamed bun, topped with fermented vegetable & peanuts, Gua Bao delivers a great combination of flavour & texture.
Pin this now to find it later!
Pin ItI’ve shared a recipe for the famous street food Rou Jia Mo from Xi’an which is known as Chinese pork burger. Today’s dish Gua Bao also resembles the look of a hamburger and it’s equally delicious.
What is Gua Bao
Gua bao (割包/刈包), also known as “pork belly buns” (or simply “bao”), is a popular street food which originated from Taiwan.
It consists of a flat steamed bao bun folded halfway to hold a piece of braised pork belly, typically topped with some fermented vegetable, ground peanuts, coriander, etc.
Many Chinese restaurants serve this type of steamed bao bun (known Hé Yè Bǐng, lotus leaf buns) on their own. So you can stuff them with any savoury dishes on the table.
The introduction of Gua Bao on Wikipedia explains in detail the history and current trend of this delicacy. Go have a read if you’d like to learn more.
The workflow
There are several preparation and cooking processes involved in the making of Gua Bao. So it’s quite important to have a good workflow. Here is the procedure that I follow:
- Braise the pork belly first. It takes a little over 1 hour if using a regular stove-top pan.
- While the pork is simmering, prepare the dough and shape the buns. Then leave them to rest for 30 minutes or so.
- During this half an hour, prepare the other fillings for Gua Bao: kimchi, peanuts, coriander, fresh chilli, etc.
- Then steam the buns. It takes about 12 minutes from boiling the water to finish steaming.
- By then, the pork belly should be tender enough to serve. You are ready to assemble Gua Bao and enjoy!
Braise the pork
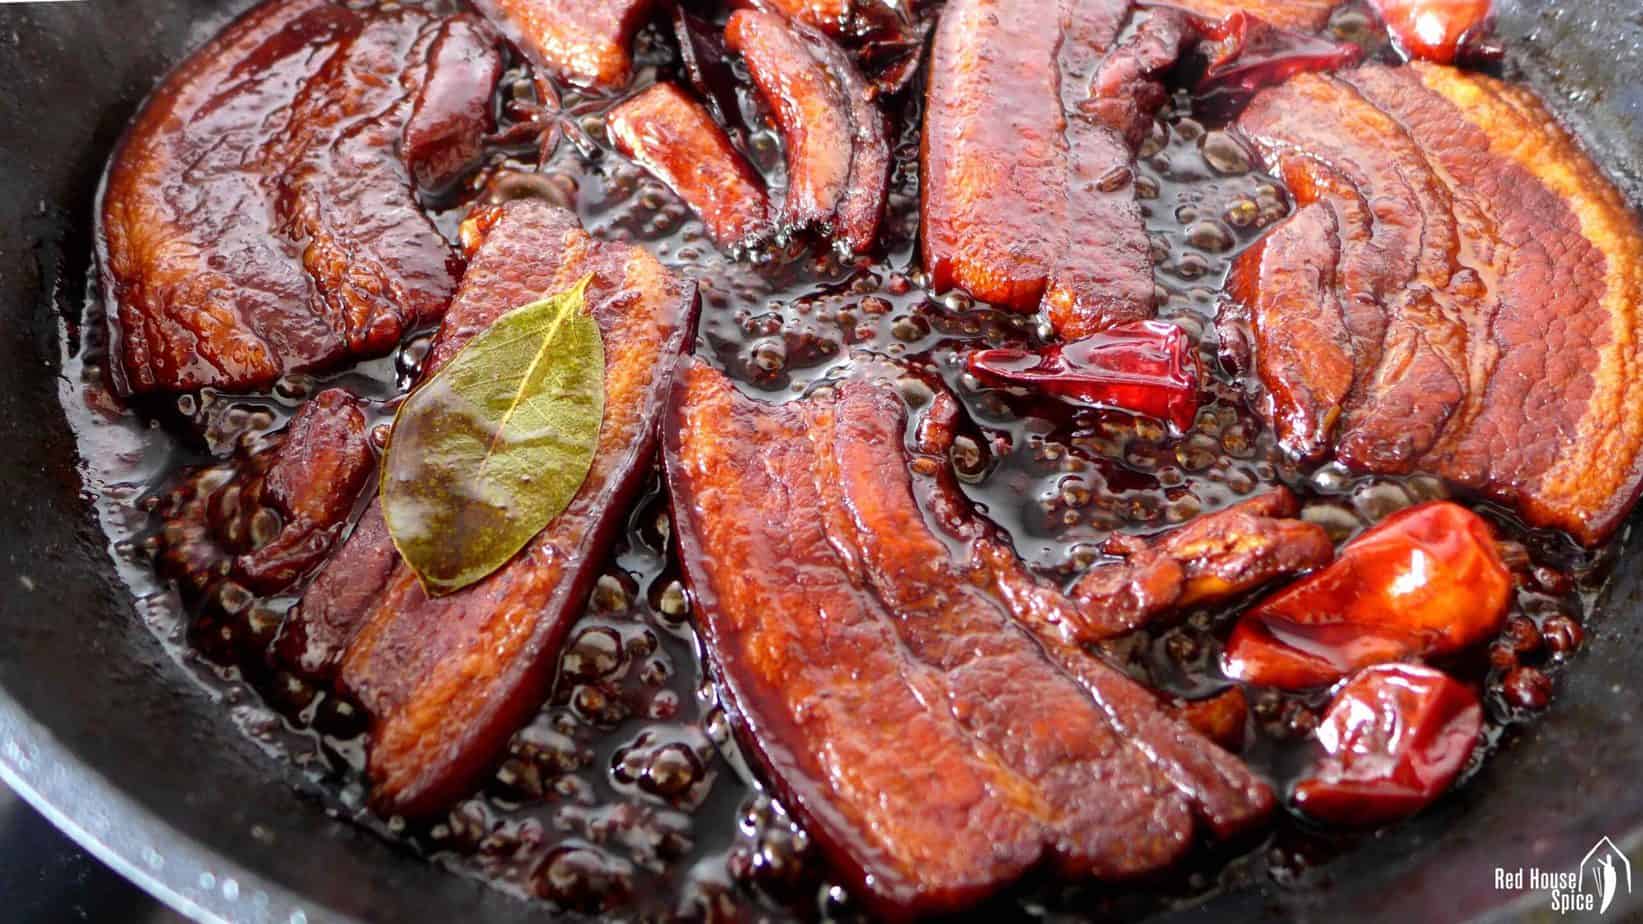
A classic filling for Taiwanese Gua Bao, pork belly slices are seasoned with various spices and cooked to a melt-in-your-mouth texture. The cooking method is very similar to Chinese red-cooked pork. It takes three simple steps:
- Firstly fry the pork belly in a little oil until it gains a lovely golden colour on both sides.
- Then add all the spices and seasoning. Cover the pork with hot water.
- Leave it to simmer over low heat for about 1 hour until fork-tender.
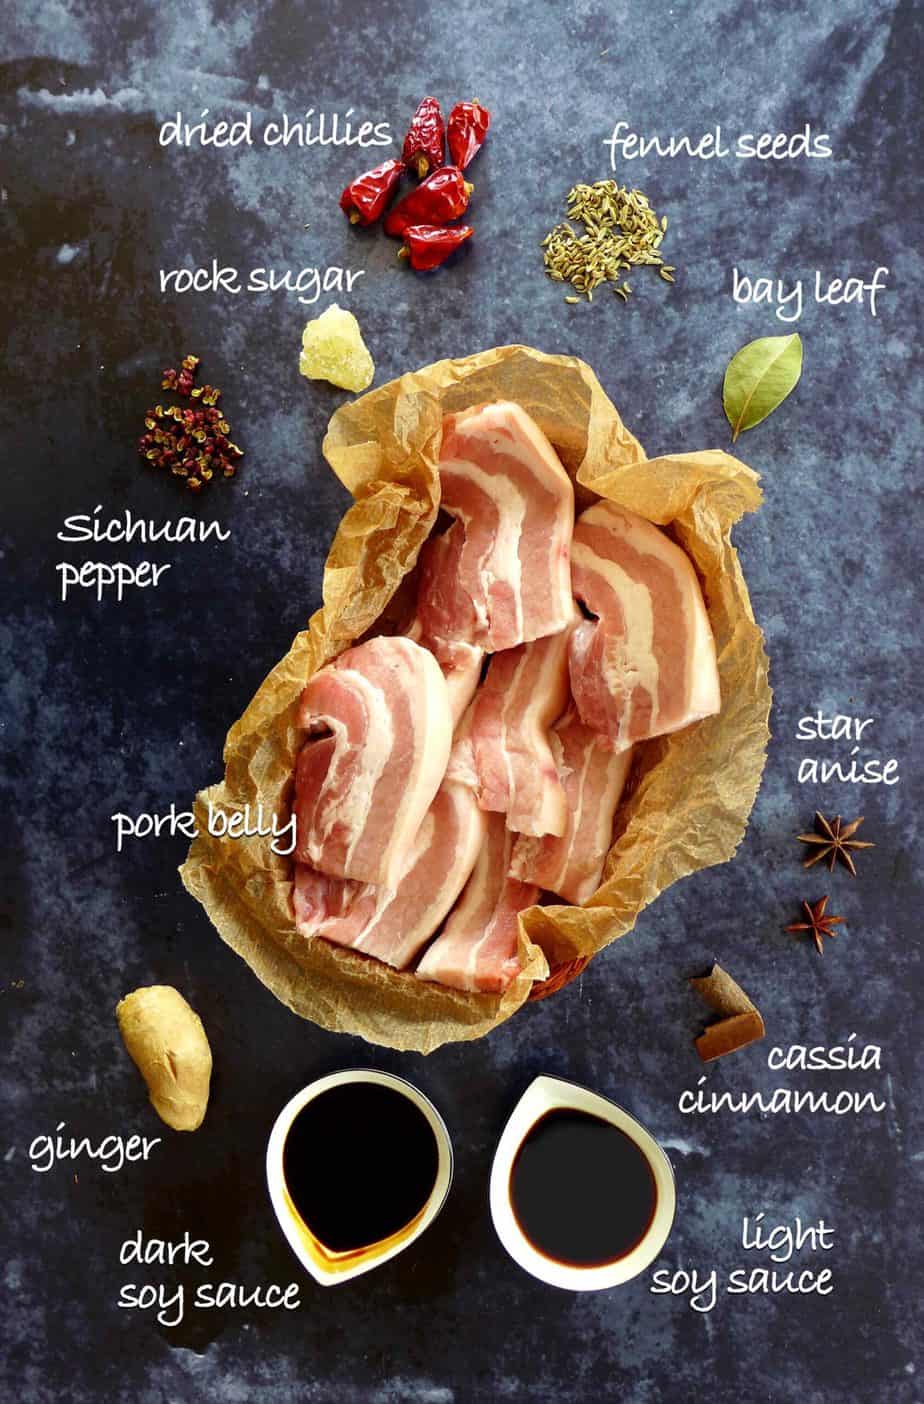
Spices & seasonings
- You will need a piece of ginger. Remove the skin then smash it (with the side of a cleaver) to fully release its flavour.
- The spice list includes star anise, cassia cinnamon, Sichuan pepper, fennel seeds, bay leaf & dried chillies. You might not have all of these in hand. Please feel free to skip one or two if unavailable.
- Use both light and dark soy sauce. The latter gives the pork an appetising brown colour. I also add a piece of rock sugar to balance the saltiness (regular sugar is fine too).
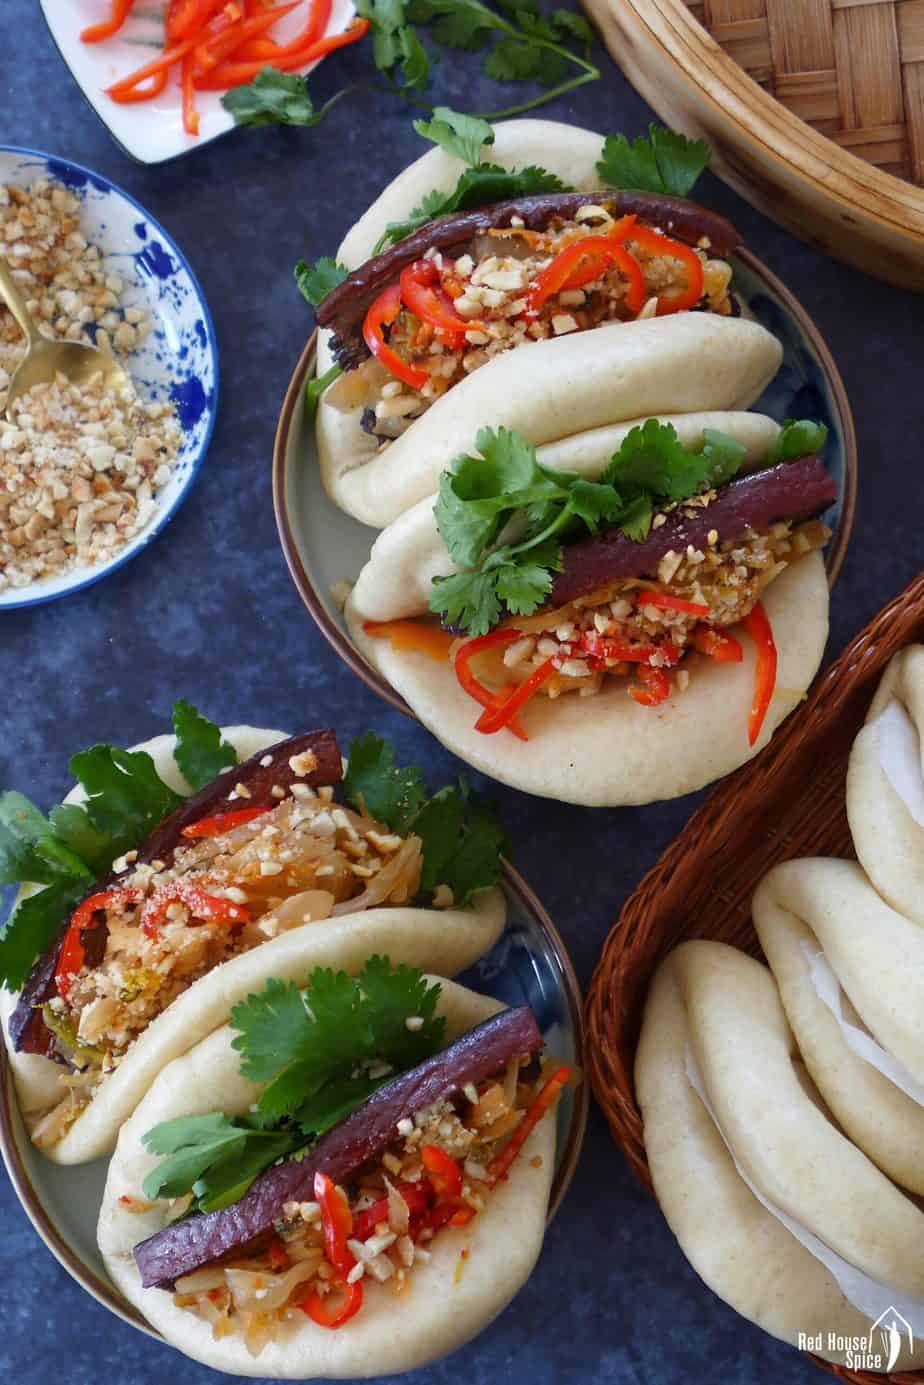
Other fillings
Apart from pork belly, classic Gua Bao involves a few other fillings that add extra flavour and texture to the dish. Based on the popular choices, my recipe also has some of my own twists. Here are the items I use:
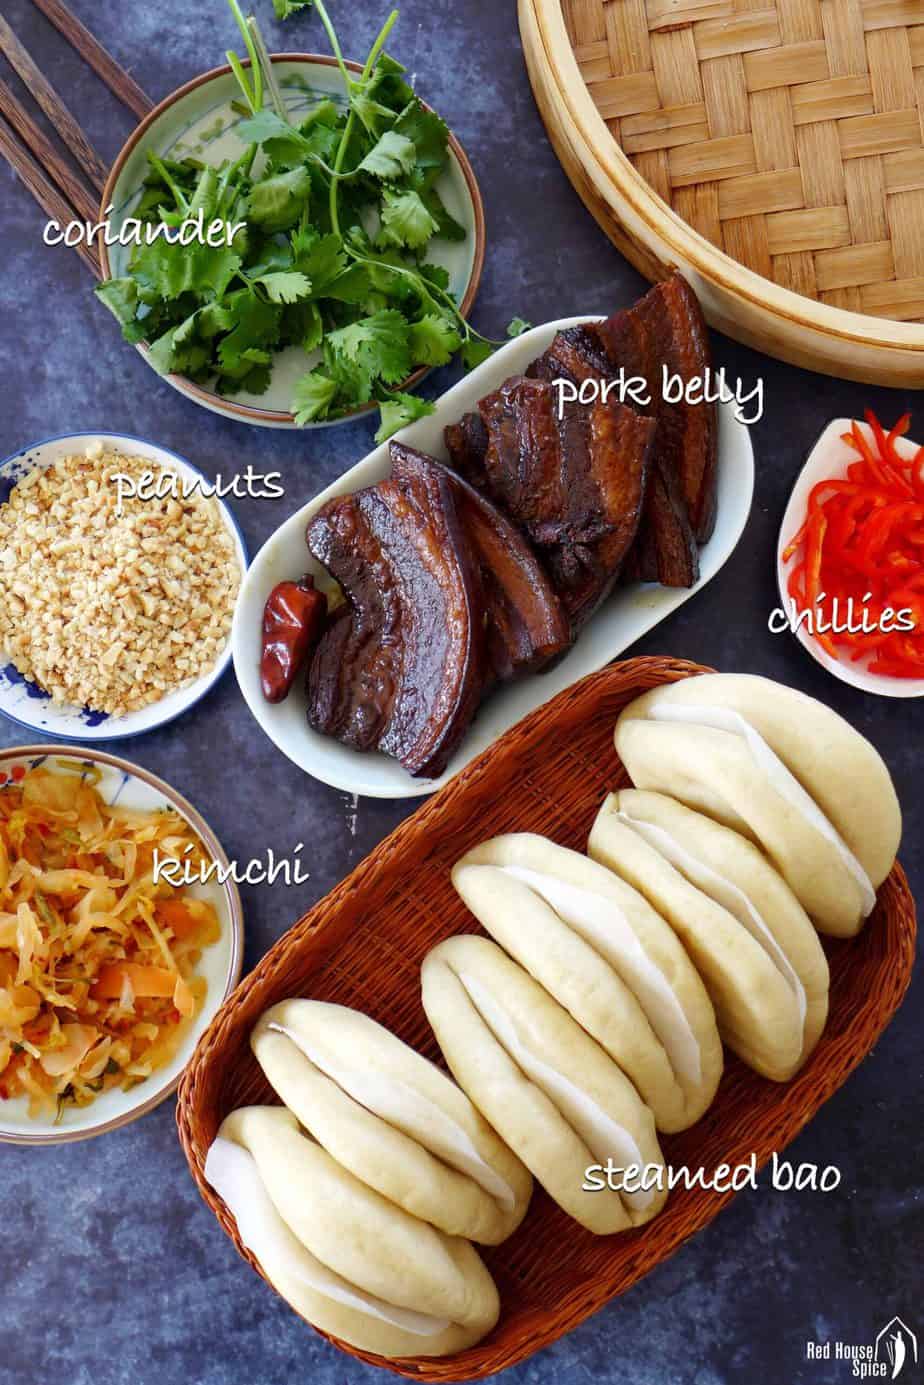
- Kimchi, Korean fermented Napa cabbage. This is a substitute for stir-fried Suan Cai/酸菜, Chinese pickled mustard greens, which is often found in classic Gua Bao. Please feel free to use any pickled vegetables that you like (eg. German sauerkraut). The saltness and fermented flavour helps to reduce the greasy taste of the pork.
- Toasted & crushed peanuts. They add a hint of smoky, nutty aroma and a little crunch to the dish. Alternatively, you can go for the traditional version which calls for ground peanuts mixed with a little sugar. Please feel free to use other nuts if you like, such as cashew nuts, walnuts, etc.
- Coriander. This can be replaced by basil, scallions, or lettuce leaves.
- Fresh chillies. Their vibrant colour makes Gua Bao even more appetising. If you have a low tolerance of heat, choose mild ones or simply skip them.
A note: If you don’t fancy pork, try my Chinese Braised Beef Shank recipe which makes a wonderful filling for these fluffy buns.
Steam the buns
An easy dough recipe
For Gua Bao, I adopt my dough recipe for Mantou (plain steamed buns) and Hua Juan (flower rolls). It’s quick and easy, ideal for those who aren’t familiar with making leavened dough. For making 8 buns, you will need:
- 300g all-purpose/plain flour
- 1 tsp instant dry yeast
- 1 tsp baking powder
- 1 tsp sugar
- 155ml lukewarm water
Four steps to follow
- Combine all the ingredients then knead into a medium-firm, smooth dough. You can achieve this by hand or using a stand mixer with a dough hook.
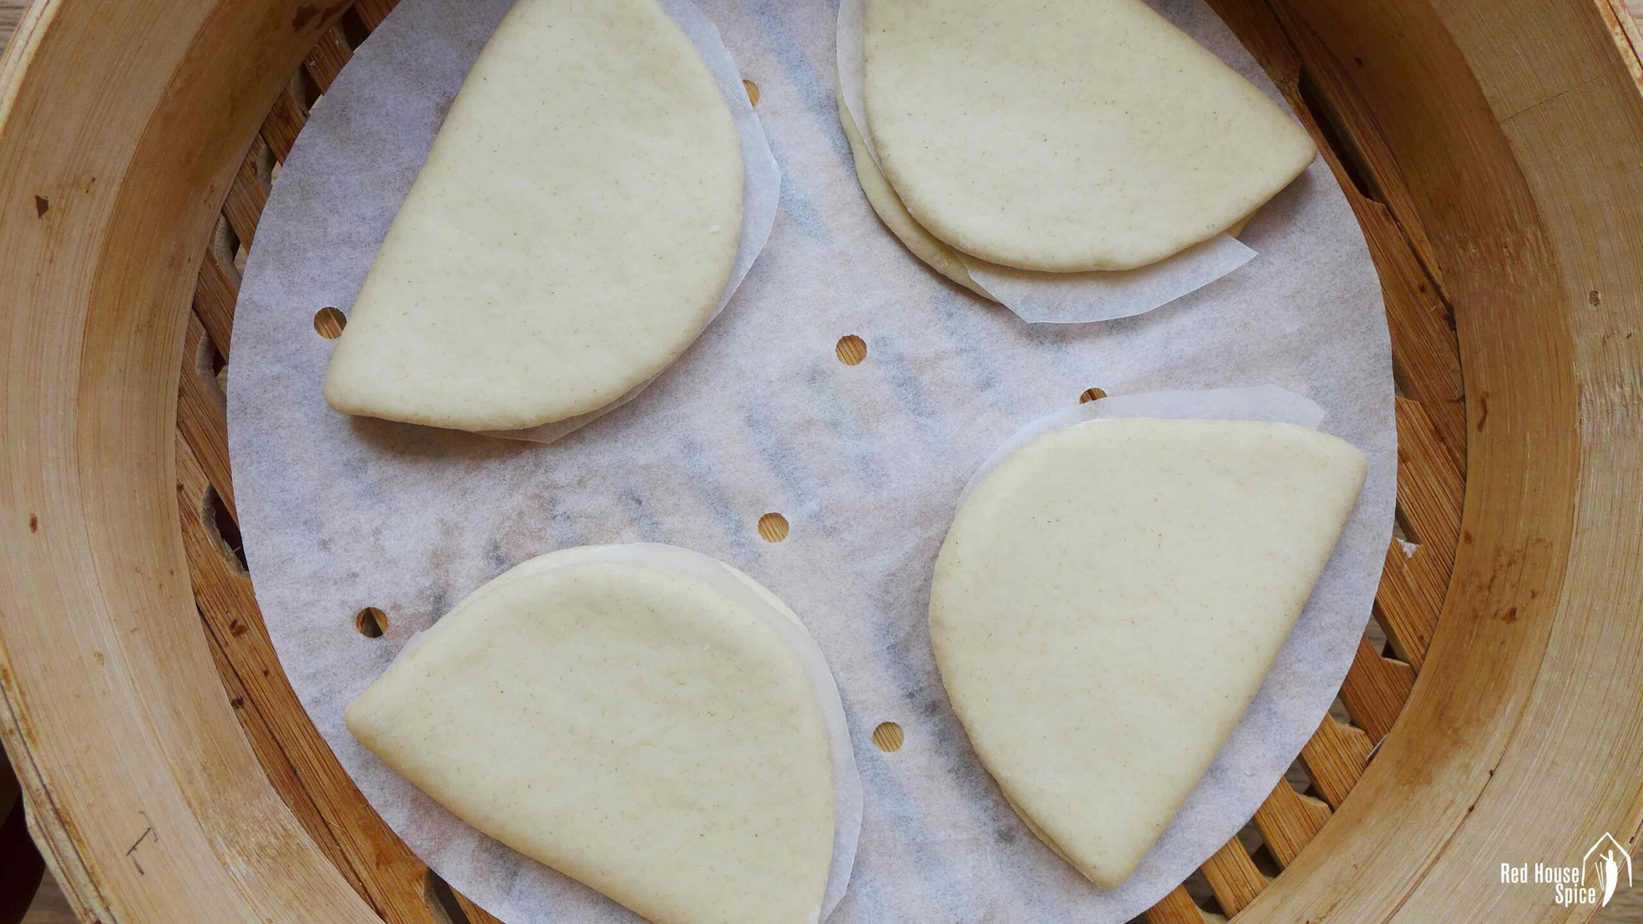
- Divide the dough into 8 parts. Flatten each piece into an oval shape then fold over. Don’t forget to place a piece of parchment paper in between.
- Rest the buns for 30 mins. The time required may vary a little. Well-rested buns should be slightly bigger but not double the size.
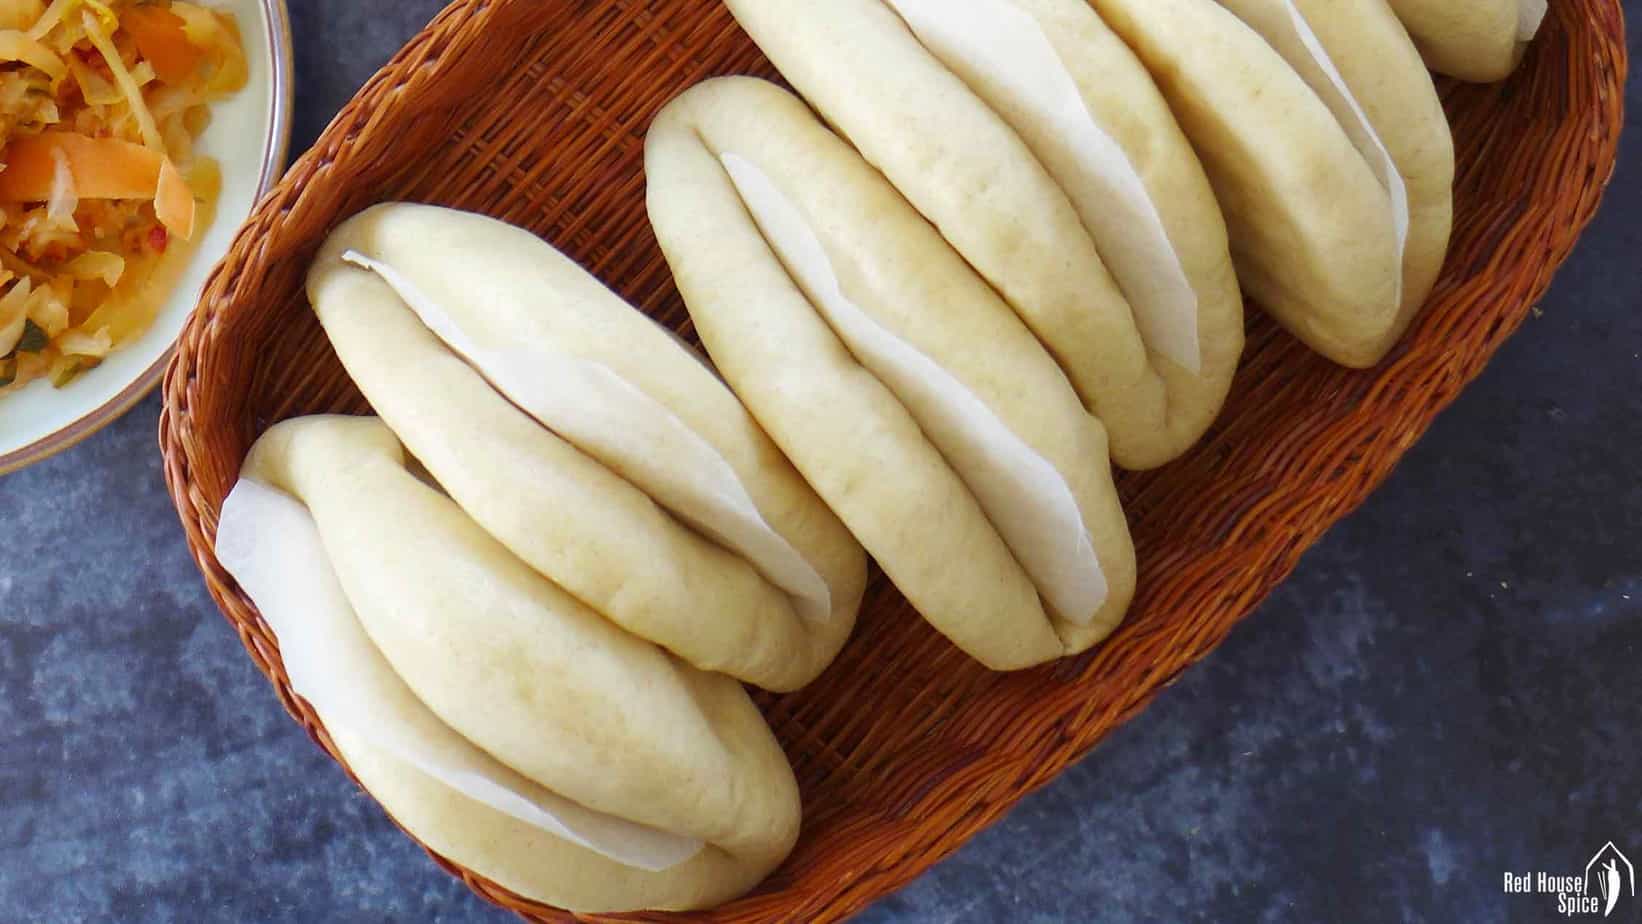
- Steam the buns for 10 minutes (count from the moment when the water starts to boil).
Make ahead tips
Gua Bao makes a great finger food for parties and it’s easy to prepare them in advance.
- Store cooked buns: You may keep cooked bao in the fridge for up to 4 days or in the freezer for 2 months. Reheat in the steamer. It takes about 4 minutes for fridge-kept ones and 6 minutes for frozen ones (no need to defrost). It’s not recommended to freeze uncooked buns.
- Store braised pork belly: Leave the pork belly to cool completely then transfer to a container along with the remaining liquid. Store it in the fridge for up to 4 days or in the freezer for 2 months. Reheat in a pan until piping hot.
You may also like
Looking for more bao and bread recipes? Check out these popular ones:


📋 Recipe card
Love this recipe? Please leave a 🌟🌟🌟🌟🌟 rating and a comment. Thank you!

Gua Bao (pork belly buns, 刈包)

Video
Ingredients
For the buns
- 300 g all-purpose/plain flour, see note 1
- 1 teaspoon instant dry yeast
- 1 teaspoon baking powder
- 1 teaspoon sugar
- 155 ml lukewarm water, see note 2
For the pork
- 500 g pork belly
- 1 tablespoon cooking oil
- 1 thumb-sized ginger
- 2 star anise
- 2 small pieces cassia cinnamon/Chinese cinnamon
- 1 teaspoon Sichuan peppercorn
- 1 teaspoon fennel seeds
- 1 bay leaf
- 6 dried chillies
- 1 small piece rock sugar, or 1 tsp regular sugar
- 1 tablespoon light soy sauce
- 1 tablespoon dark soy sauce
You also need
- coriander, or other herbs of your choice
- kimchi, or other fermented vegetables, see note 3
- roasted peanuts, coarsely crushed, see note 4 & 5
- fresh chilli, finely chopped, optional
Instructions
Cook the pork belly
- Cut the pork belly into 8 rectangle pieces.
- Heat oil in a frying pan over high heat. Fry the pork belly until both sides turn golden.
- Add ginger, spices, sugar, dark & light soy sauce. Pour in boiling water (just enough to cover the meat).
- Turn the heat down low. Leave to simmer for about 1 hour until the meat becomes very tender.
Prepare the dough
- IF KNEADING BY HAND: Mix flour, yeast, baking powder and sugar. Add water gradually. Mix with chopsticks/spatula until no more loose flour can be seen. Combine and knead briefly into a dough. Leave to rest for 10 minutes (covered). Knead again until very smooth.
- IF KNEADING WITH A STAND MIXER: Mix flour, yeast, baking powder and sugar in the bowl. Knead on low speed until a very smooth dough forms (about 8 minutes)
Shape the buns
- Divide the dough into 8 pieces. Roll each piece into a ball.
- Press the ball with the palm of your hand. Flatten it with a rolling pin into an oval shape.
- Fold the dough lengthways and place a piece of parchment paper in between (please refer to the tutorial video below).
Rest the buns
- Place the buns in the steamer basket (line with steamer parchment paper or brush a thin layer of oil to avoid sticking). Make sure to leave ample space in between each one.
- Leave to rest for around 30 minutes. Well-rested buns should be slightly bigger but not double the size (see note 6).
Steam the buns
- Place the steaming basket onto a pot/wok filled with cold water. Start cooking over high heat.
- Turn down to medium-low once the water is at a full boil. Count 10 mins from this moment.
Assemble the dish
- Open up one bun. Place in coriander, then a piece of pork belly, top with kimchi, crushed peanuts and fresh chillies.
Store and reheat
- You may keep cooked buns in the fridge for up to 4 days or in the freezer for 2 months. Reheat in the steamer. It takes about 4 minutes for fridge-kept ones or 6 minutes for frozen ones (no need to defrost). It’s not recommended to freeze uncooked buns.
- You may also braise the pork belly in advance. Keep it along with the remaining liquid in the fridge for up to 4 days or in the freezer for 2 months. Reheat in a pan until piping hot.
Notes
Your Recipe Notes
Nutrition
Nutrition information is automatically calculated, so should only be used as an approximation.


Delicious x
Thank you for trying my recipe Maria!
I made the braised pork belly and used this recipe for the bao buns. I’ve never had either of these foods. The braised pork was lucious and the buns came out looking like I got it all correct. I do have a question, the buns have no salt and therefore are very bland. Can I assume that is because the fillings used are usually high in sodium?
Thank you for trying out my recipes! Chinese steamed buns are supposed to have a plain taste so usually there is no salt added to the dough. Yes, the savory taste comes from the fillings used in the buns.
Great recipe!
One question though, can these buns not be reheated in a microwave with a drop of water and slightly covered to create the steam? Maybe for a minute or two? Has this been trialed at all?
Yes, Anna! You can reheat them in a microwave following the tips you mentioned above. Try one minute then check. Add 30 seconds at a time until heated properly.
Receta excelente.
After steaming as directed the buns were still like dough. I ended up cooking them 10 more minutes and while they were cooked they were still very heavy. I’m in Canada where we have very high gluten all purpose flour so I added 30 grams of corn starch to 270 grams of flour. I had to add more water. I am also at a high altitude. Trying again today with self rising cake flour as the supermarket didn’t have regular cake flour. I’ve left out the cornstarch and baking powder. I’m not sure exactly what the gluten content is as a percentage but it’s lower than all purpose flour. Usually I can find cake flour but maybe only at Christmas. This time I used 155 ml of water, as directed, but the dough cracks around the edges when I roll it out. It’s resting now but for the next try I’ll use 155 plus 1 tablespoon of water. I am determined to make this work!
Thank you for trying my recipe Sharon and sorry to hear that you’ve encountered some problems. High gluten flour isn’t the ideal choice but it still works for this recipe (I’ve tested before). As I mentioned in the post, you’ll need to adjust the water quantity accordingly. I suspect that it was the high altitude that affected the result. If the dough cracks, it’s probably too dry. Good luck!
I made this for dinner and it’s amazing! I wanted to ask if you know how to make turnip cake..(lo bak go)? and for Char Siu Bao..sweet pork bun? Is the bun made the same of this one?
Thank you Simo for trying out my recipe. I’m currently writing a recipe for Char Siu Bao and will publish it soon. The dough recipe is different from this one. Turnip cake is on my to-write list.
Love this! Great flavours and textures. Thanks for sharing the recipe and all of the details behind the preparations. It’s the 1st time I’ve made this, and I’ll be making it a regularly! Easy to substitute and add variations based on what ingredients are on hand.
My pleasure Diane! Yes, it’s such a versatile dish. Once you understand the basics, you can improvise with various ingredients.
Instead of cooking the pork on the stovetop, can you recommend an oven temperature. Thank you.
I’d say 400°F/200°C. The cooking time required depends on the weight & thickness of the pork belly slices.