
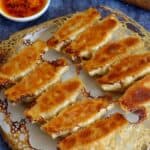
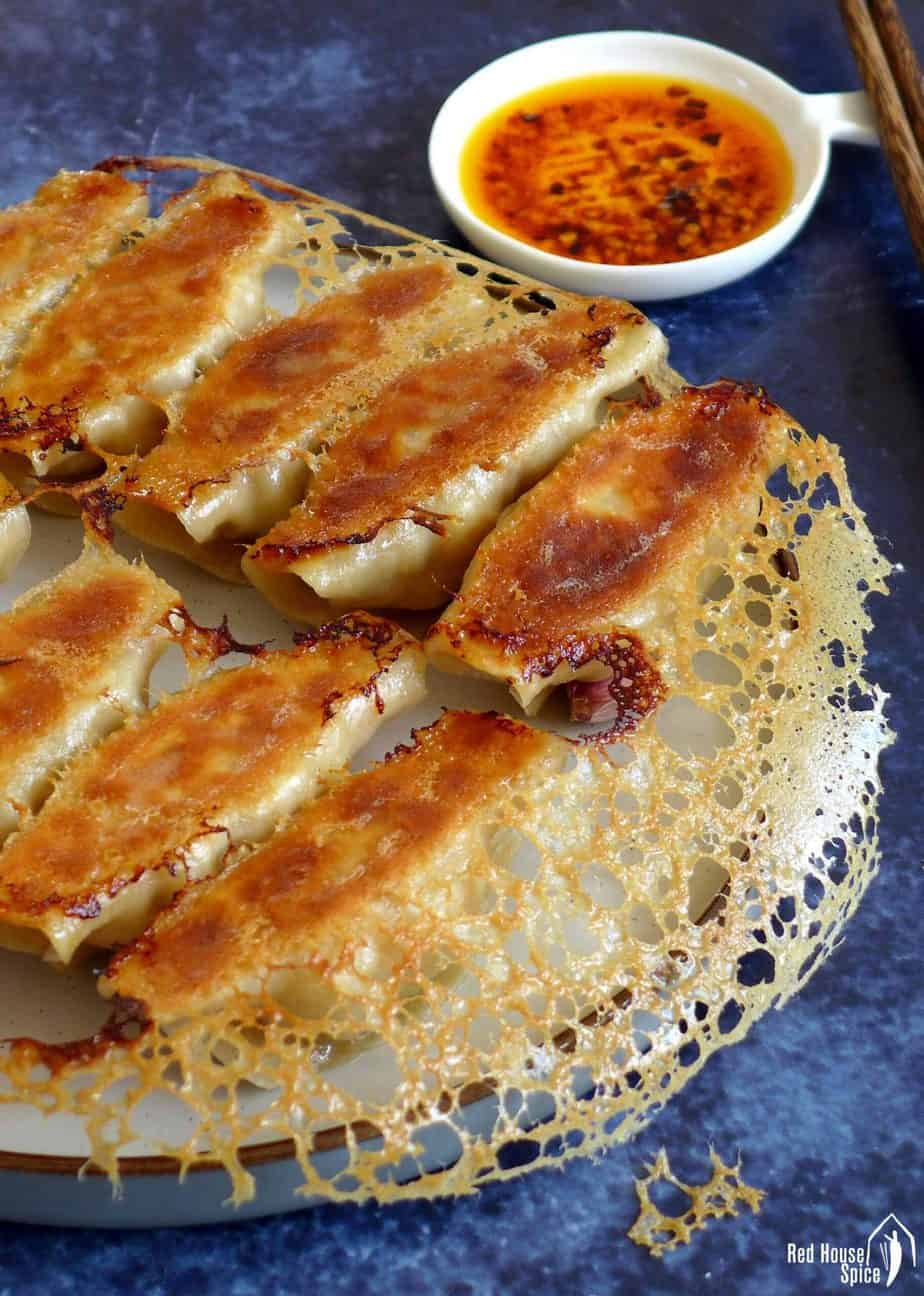
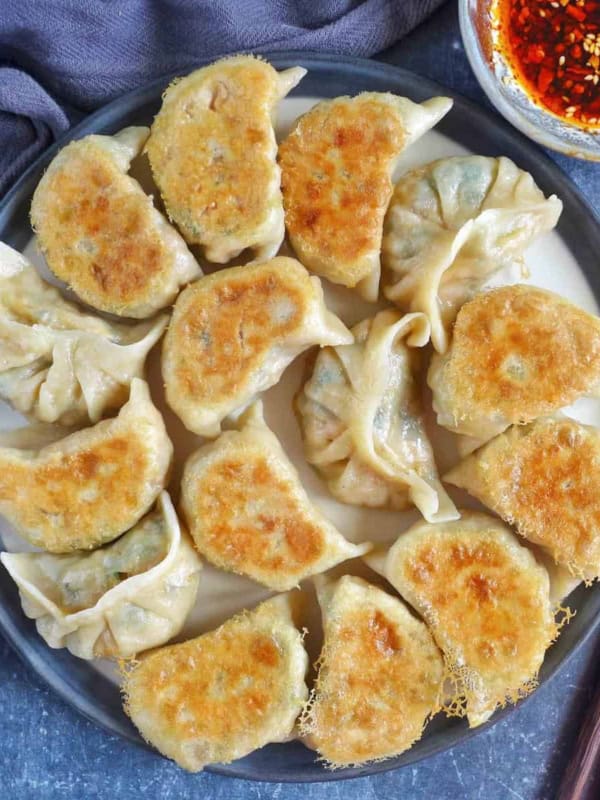
Stuffed with a delicious filling and pan-fried to perfection, chicken potstickers are a firm family favorite that we constantly crave. You should try them too!
What are potstickers
Potstickers refer to Chinese dumplings which are pan-fried instead of being boiled or steamed. It’s the literal translation of the Chinese term for this type of dumplings: Guō Tiē (锅=pot/wok, 贴=to stick). Sometimes, another word Jiān Jiǎo/煎饺 (pan-fried dumplings) is used to describe them.
Usually filled with a delicious meat and veggie filling, potstickers are not only great in terms of taste but also very appealing for the two-in-one texture of the wrappers: the steamed top part remains soft while the fried bottom part becomes golden and crispy.
To make it even more attractive, Chinese cooks often add a starchy slurry during the cooking process. It creates a lace-patterned crispy skirt around the potstickers. Delicious in the mouth and for your eyes. Today’s recipe Chicken Potstickers(鸡肉锅贴) is a great example.
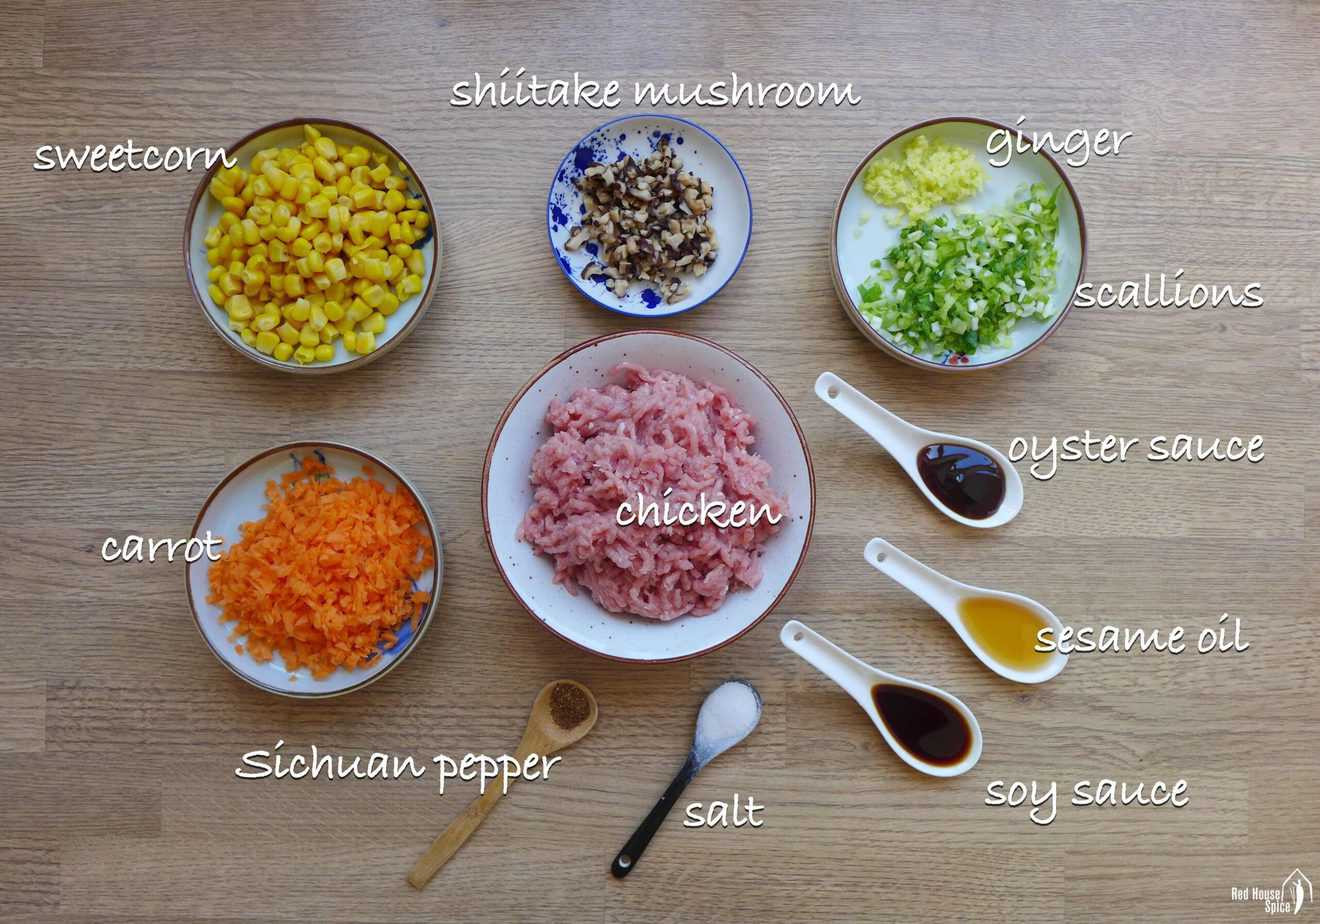
A chicken & sweetcorn filling
There are hundreds of ways to make delicious dumpling fillings. I often pick what I have at hand and improvise with some general principles in mind: choose one type of protein (meat, tofu, eggs) and some vegetables, add herbs if necessary, season with what goes well with the main ingredients.
Pin this now to find it later!
Pin ItI’m very excited to introduce today’s chicken & sweetcorn filling which is the new favourite in our Red House! It’s not a traditional filling. But the taste is so satisfying!
Here are what you need:
- Minced chicken. I prefer mince chicken thigh which is more flavoursome than minced chicken breast. You can substitute it with minced turkey thigh, or pork if you like.
- Sweetcorn kernels. I use canned one without added sugar or salt. No need to mince them like other ingredients. Their crunchiness and natural sweetness really make this filling extra tasty.
- Carrot. I add it for extra nutrients and for its vibrant colour.
- Shiitake mushrooms offer great umami taste. You may use fresh ones or dried ones (soak in water for over 8 hours to rehydrate).
- Scallions & ginger. They are essential for most meat-based dumpling fillings.
- Soy sauce & oyster sauce provide aromatic saltiness and umami taste.
- Sesame oil. I love its intense nutty flavour. Make sure you use Chinese toasted sesame oil (not the pale-coloured raw sesame oil).
- Ground Sichuan pepper. This can be replaced by Chinese five-spice powder or white pepper.
- Salt. Please feel free to adjust the quantity based on your own taste.
How to make great wrappers
If you have followed my dumpling recipes, you definitely know that I am a strong advocate for homemade dumpling wrappers. If you have never tried making them, please read ahead and find out the reasons why I encourage you to do so:
Only two ingredients required
Flour & water. That’s all! Different from my usual dumpling wrappers which call for tap water only, I use a “half hot dough/半烫面” formula for these potstickers. That means adding “1/2 boiling water + 1/2 tap water” to the flour. Wrappers made this way have a slightly softer texture which is great for the pan-fried version.
All-purpose flour works well
No need to pay a special visit to an Asian shop to get “dumpling flour”. All-purpose flour works perfectly. Follow my flour-water ratio but please feel free to make adjustments (increase/decrease a little the water volume) as flour of different brands has different water absorption capacity.
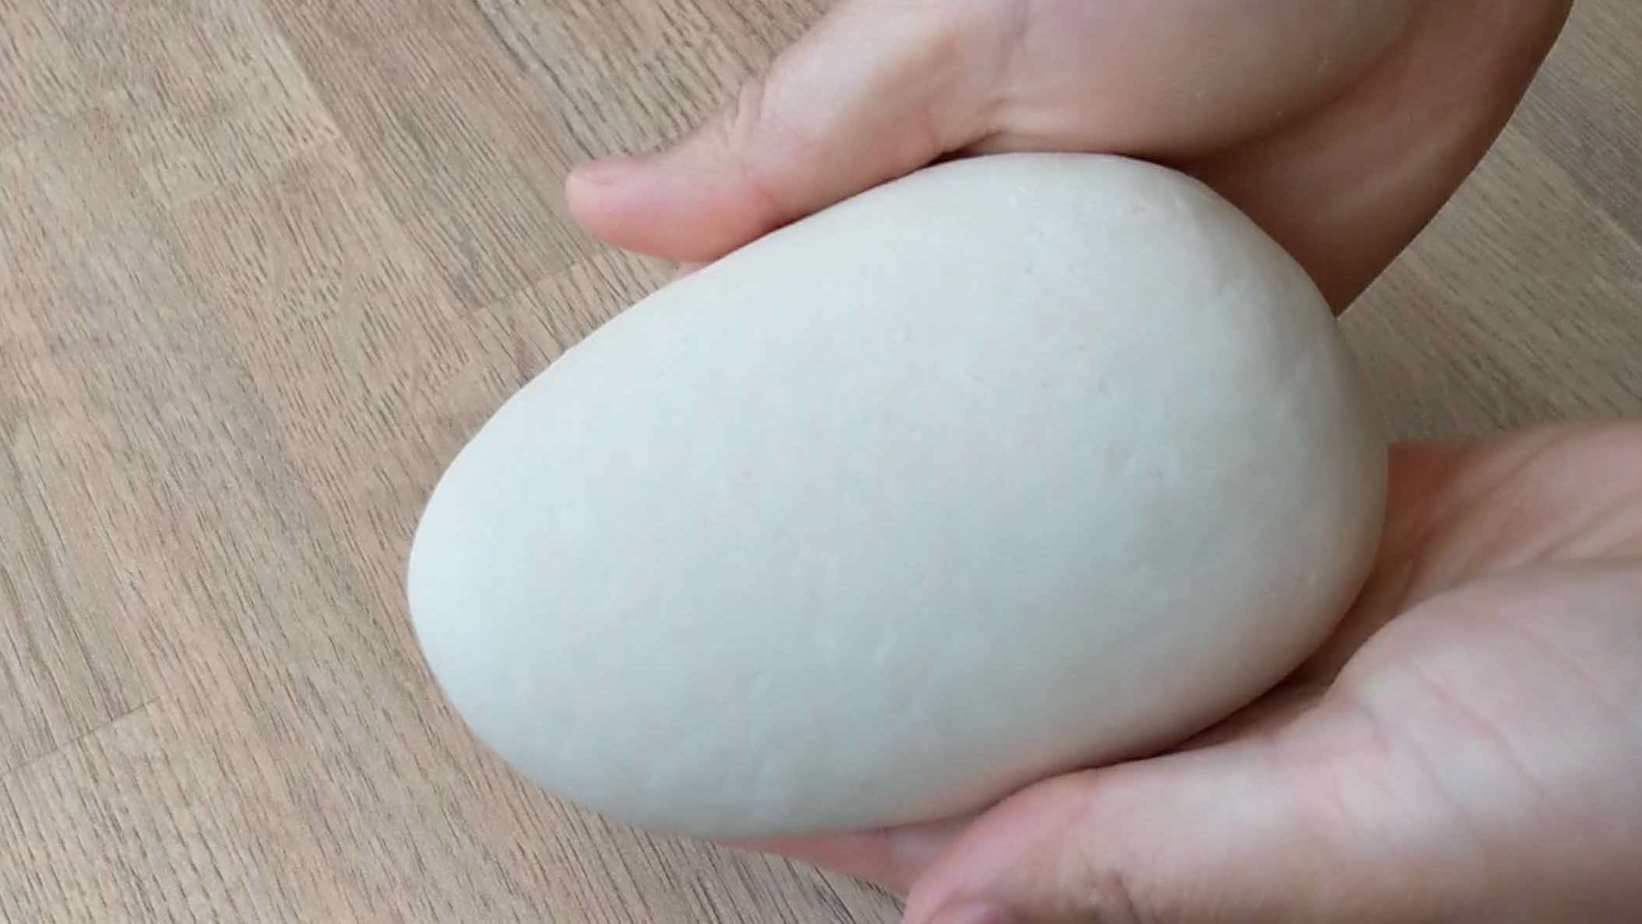
Hand kneading can be easy
You don’t need a stand mixer to make dumpling dough. Here is my trick: after initially combining water and flour to form a rough-looking dough, leave it to rest for 10 mins or so then knead again. It will take only 1-2 mins to make it very smooth.
Resting does the magic
After you’ve made the dough smooth, leave it to rest for another 30-60 mins. Then the dough will become soft and elastic, thus very easy to work with.
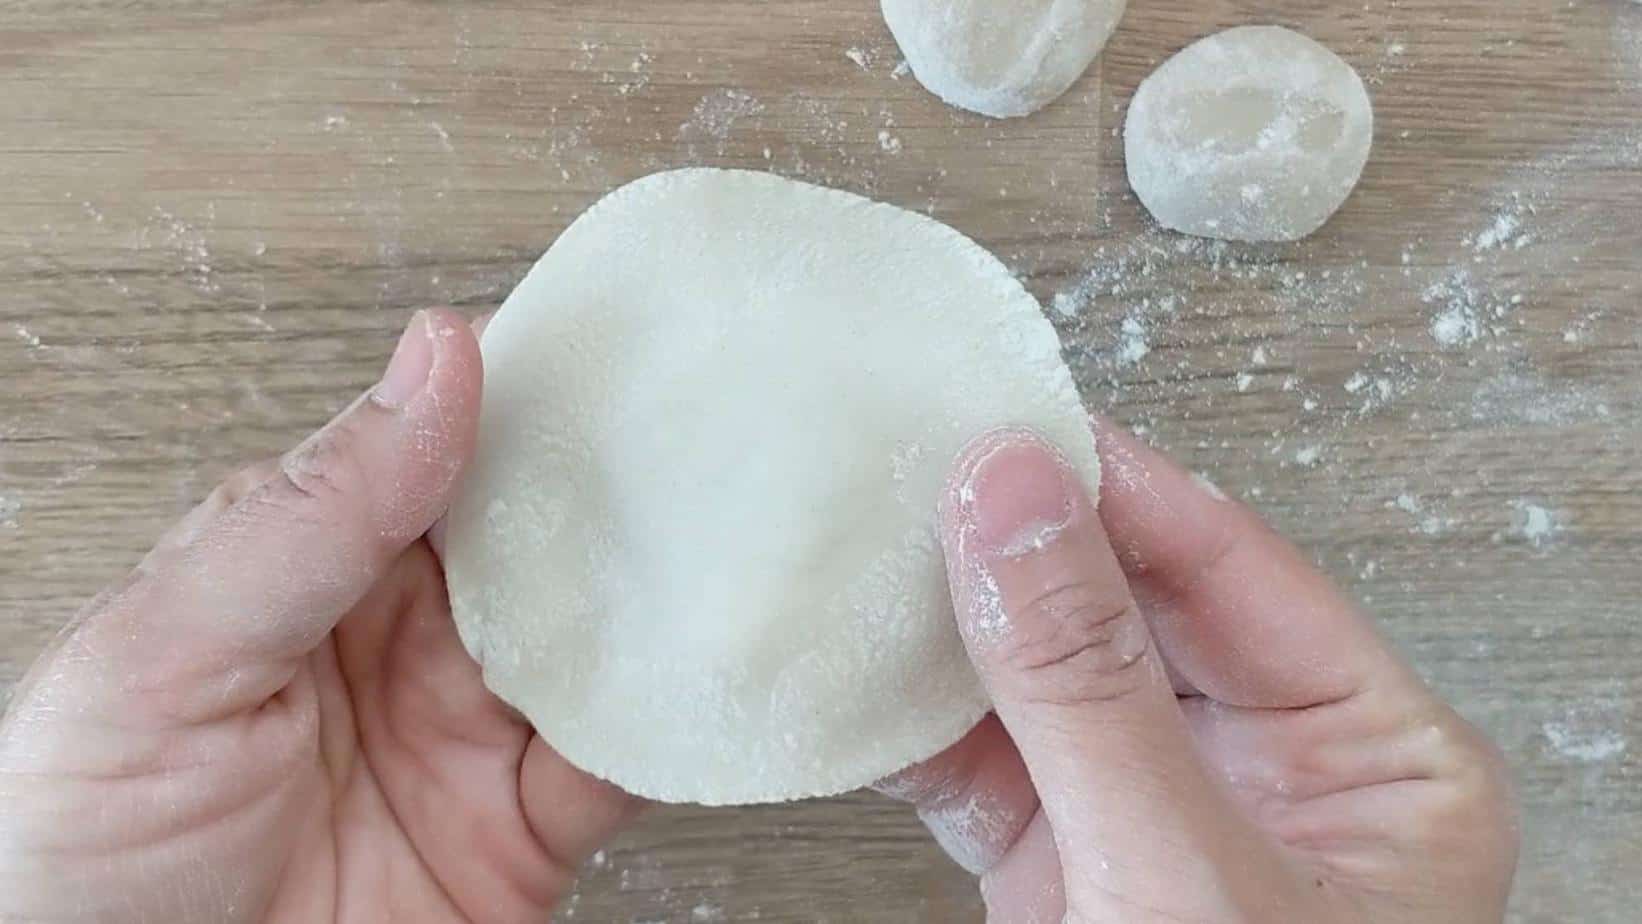
Follow the roll & turn method
It can be tricky to roll a piece of dough into a round wrapper. But it isn’t impossible! Please have a look at my tutorial video in the recipe card below and follow my roll & turn method. Here are some troubleshooting tips:
- Problem: Dough too hard to roll. Solution: Leave the dough to rest a little longer.
- Problem: Dough sticks. Solution: Dust the work surface and the rolling pin with some flour.
- Problem: Wrapper shrinks when rolling. Solution: You probably have overly kneaded the dough right before rolling. Leave to rest for a couple of minutes to relax its gluten network.
- Problem: Can’t roll it round. Solution: Firstly, they don’t have to be perfectly round. Secondly, practice makes perfect!
The simplest folding method
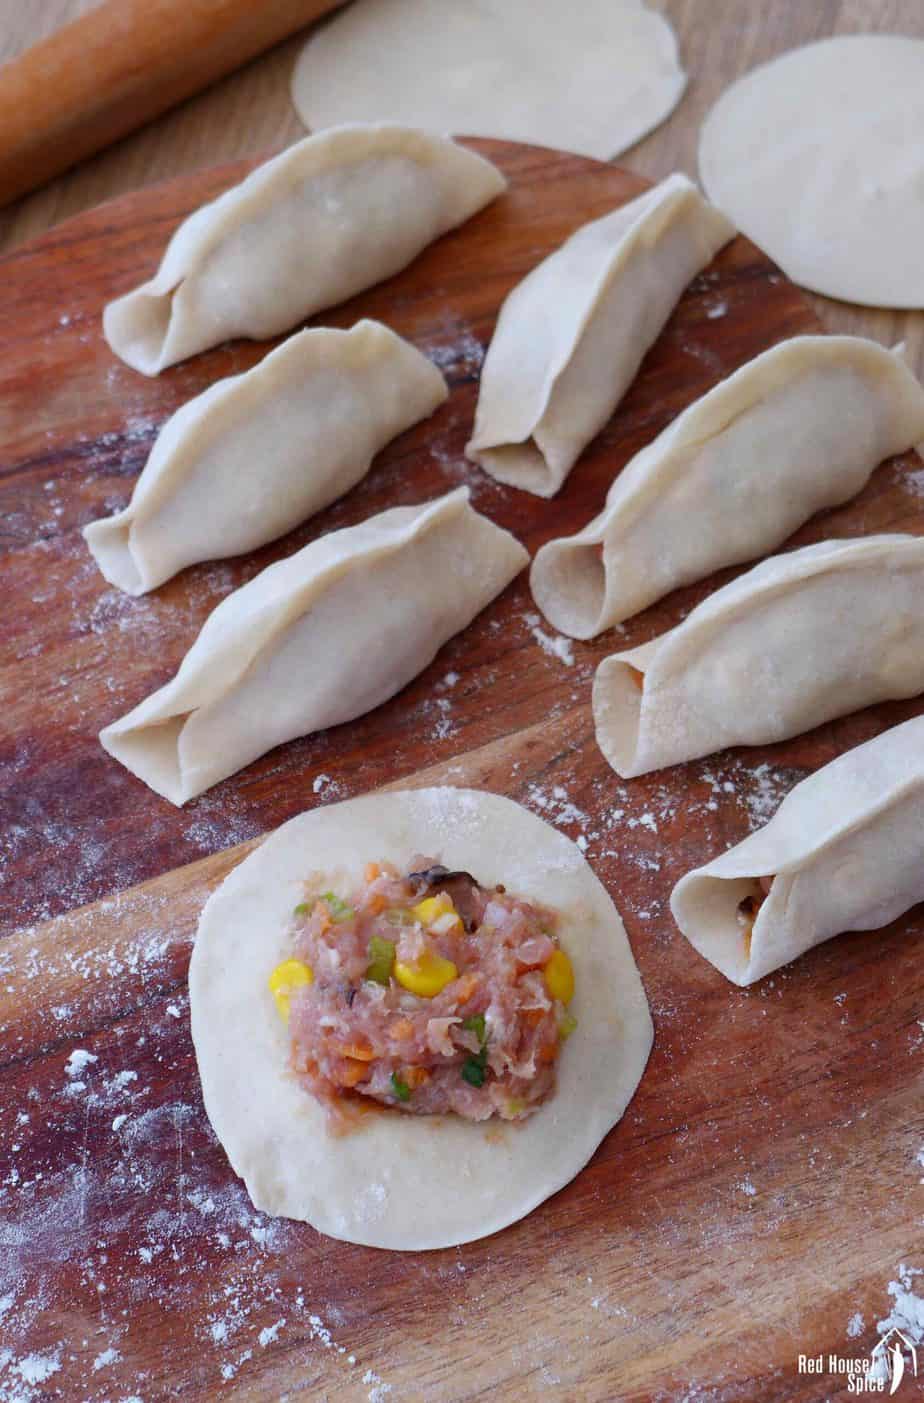
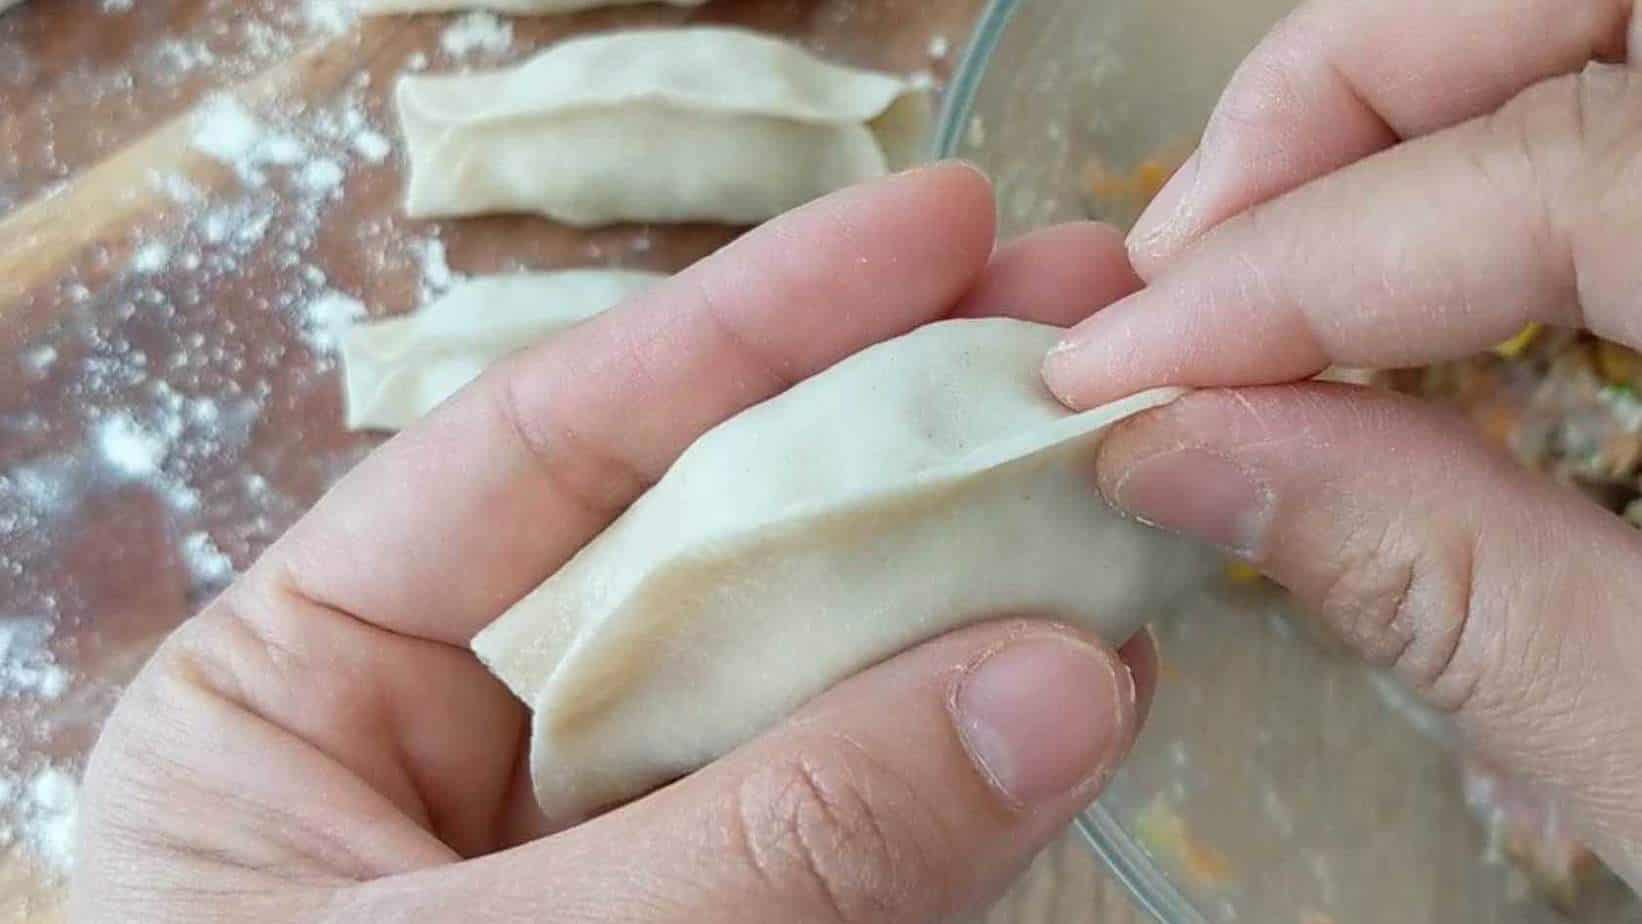
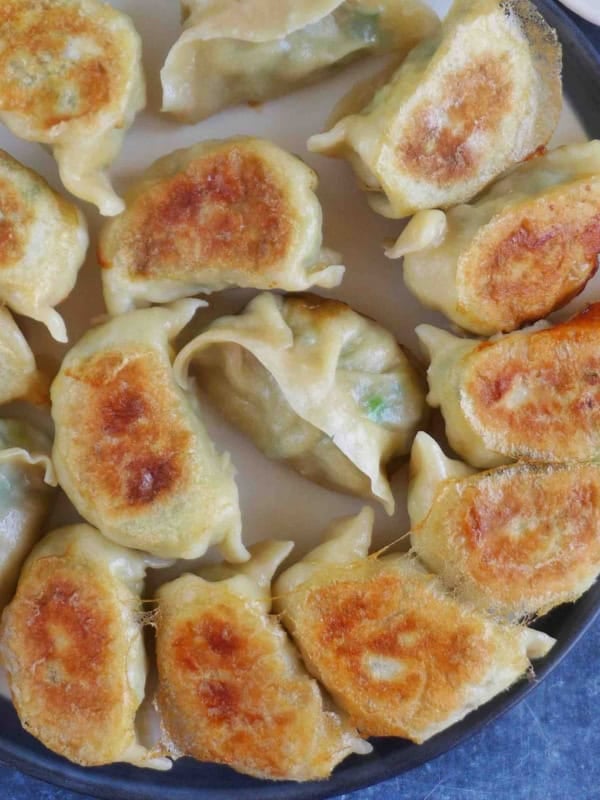
Are you intimidated by dumpling folding? If that’s the case, you should try this recipe. No fancy pleating needed. All you have to do is pinching the edge of a wrapper to seal. In fact, the potsticker isn’t fully sealed. As shown in the image above, the two ends are left open.
This partially sealed style is the most popular look of potstickers served in restaurants in China. It may not look sophisticated, but there is a good reason behind it. The open ends help the steam to circulate so it takes less time to cook through the meat filling. Without prolonged cooking, the wrapper retains a soft texture.
If you like this simple look but wish to try a different filling, I suggest you use a filling that isn’t too wet. Otherwise, the liquid can easily leak out from the unsealed ends. Or, seal your potstickers completely like common dumplings and increase the volume of the water/slurry used for pan-frying. For inspiration, check out my guide on Ten Ways to Fold Dumplings and Six Ways to Fold Wontons.
How to pan-fry potstickers
Compared to dumplings cooked using other methods (boiled/steamed), potstickers are extra appealing for their golden, crispy bottom and their wonderful flavour and texture. As I explained in “Three ways to cook dumplings”, the pan-frying process is actually “Fry, steam, fry”.
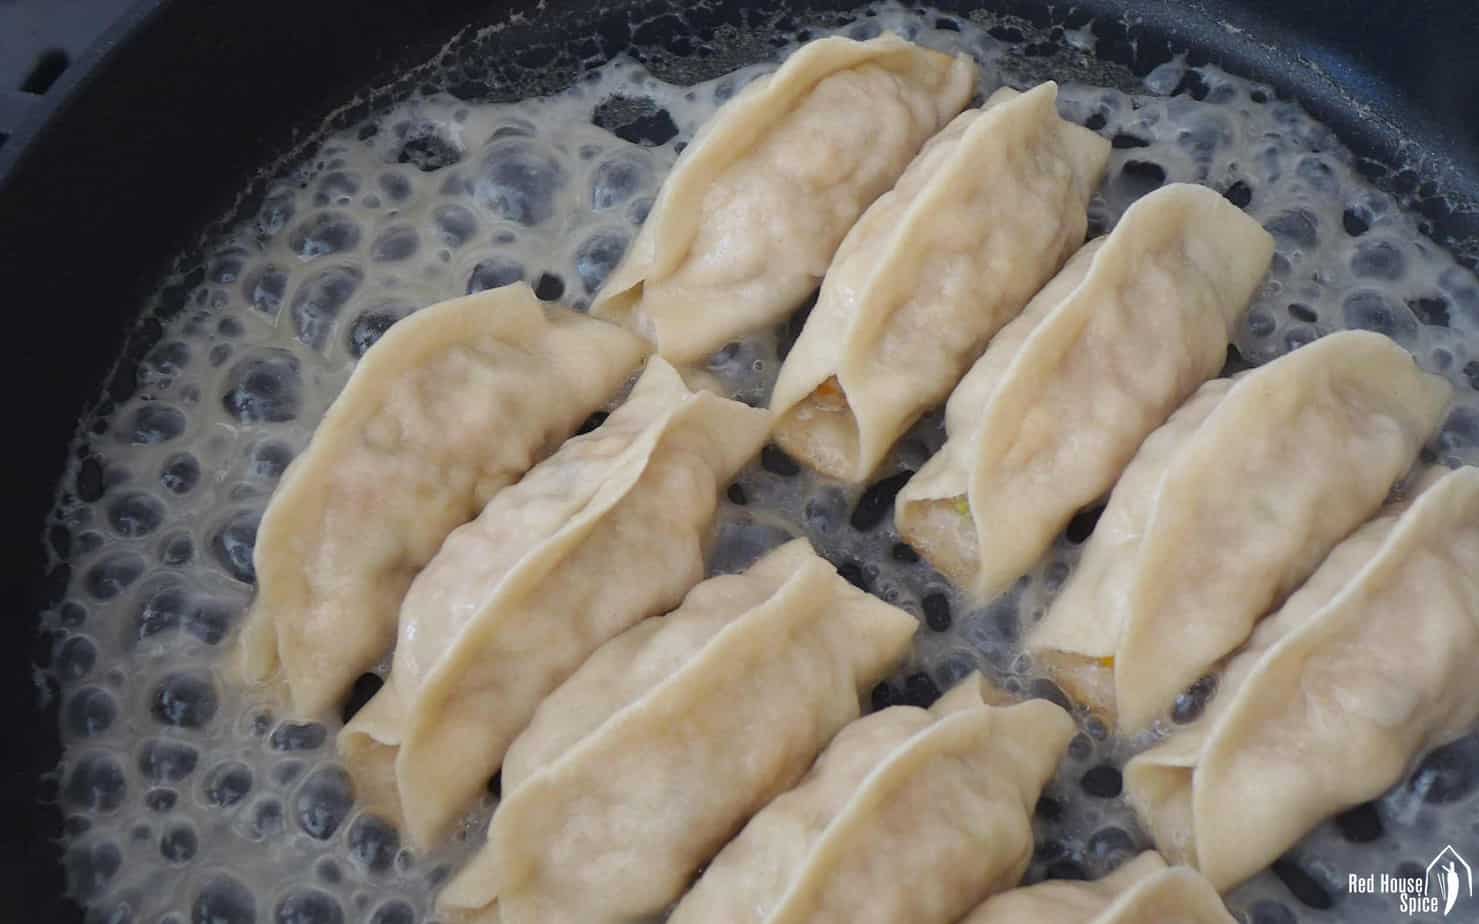
- Pour a little oil into the pan then add the potstickers.
- When the bottom part of the potstickers turns light brown, pour in cold water or slurry (explained later) then immediately cover with a lid.
- Uncover when the water evaporates. Cook another 30 seconds or so to crisp up.
Quite simple, isn’t it? To ensure success, I have a few extra tips for you:
- Keep high heat/flame throughout the cooking.
- Use a reasonable amount of oil that’s just enough to coat the bottom of the potstickers.
- Thick-bottomed frying pans are preferable as they distribute heat evenly thus the potstickers get golden evenly.
- Pans with non-stick coating work better. If not, make sure you use a little extra oil and don’t move the dumplings until the bottom part hardens.
How to make a crispy skirt
This the most exciting part that I’d like to share with you. On top of the golden crust at the bottom of the chicken potstickers, we are going to add a crispy skirt on the edge. In Chinese, we call it Bīng Huā Guō Tiē/冰花锅贴 which means “snowflake potstickers”, although some think the skirt looks more like a lace pattern.
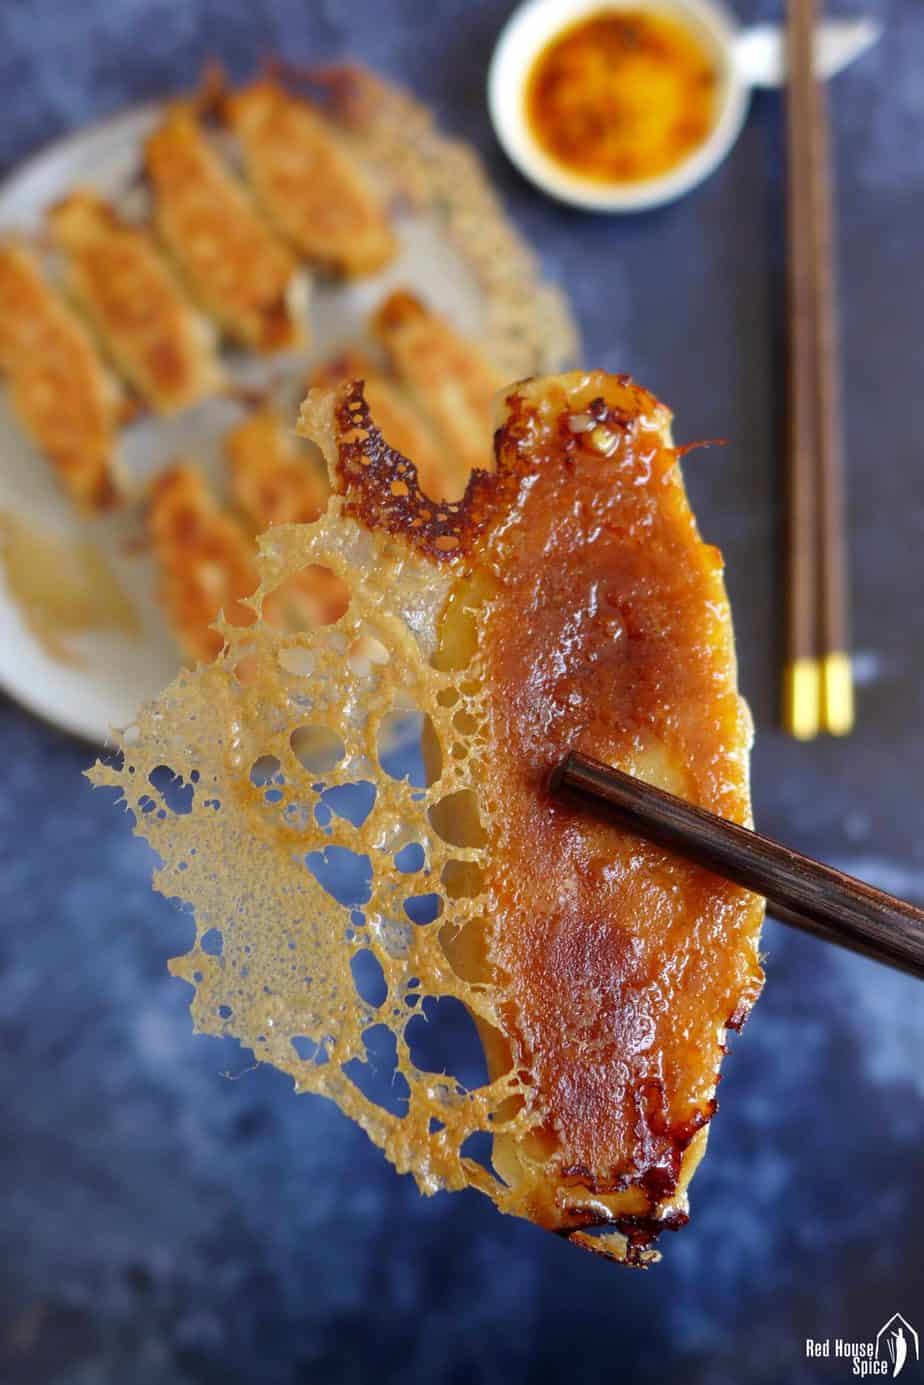
To create a beautiful, crispy skirt, you will need to replace water with a starchy slurry for the pan-frying process. I’ve tested numerous formulas of the slurry and finally found the ideal ratio which makes a light, airy and super crispy skirt. For frying 10 potstickers at a time, you will need:
- 1 teaspoon cornstarch
- 1/2 teaspoon all-purpose flour
- 100ml water
- 1/4 teaspoon vinegar. Any type will do. It adds extra crispiness to the skirt.
Always remember to stir the slurry very well right before pouring into the pan as cornstarch sinks to the bottom very easily. You may fry more chicken potstickers at once in a larger pan. In this case, increase the quantity of the slurry accordingly.
How to make them in advance
A definite crowd-pleaser, potstickers/dumplings is the dish I always serve when hosting dinner parties. They can be easily made in advance. Here is how I freeze them and cook on the occasion.
- Assemble a big batch of potstickers. Place them on a tray lined with parchment paper (or dusted with flour) then put into the freezer.
- When completely frozen, transfer them into an airtight plastic bag/container. Store in the freezer for up to three months.
- Without defrosting, pan fry the frozen potstickers following the same instructions explained above. Make sure you increase the quantity of the slurry/water by 50% as it takes a little longer to cook through.
Make a delicious dipping sauce
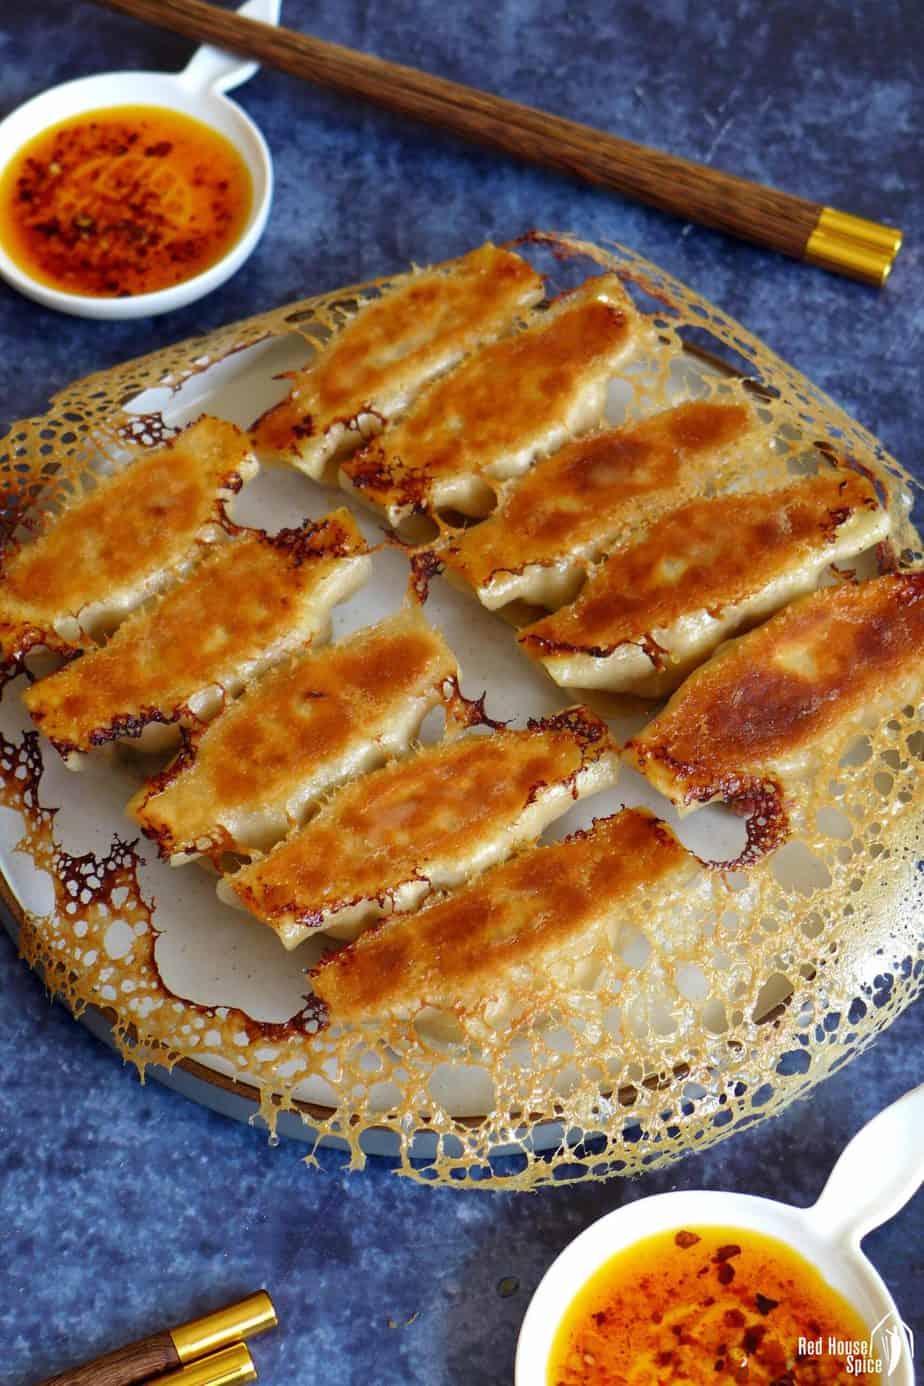
Well seasoned and properly fried, these chicken potstickers taste wonderful on their own. However, it’s always nice to serve them with a good dipping sauce for an extra kick on the palate. I often use a minimalist sauce consisting of black rice vinegar and homemade chilli oil. Simple yet satisfying!
Looking for more options? Read my post on “Six dumpling dipping sauces”. It has some non-spicy choices and general tips on how to mix & match your own dipping sauce.
My Ultimate Dumpling Guide
If you are keen to explore further, don’t forget to check out my Ultimate Dumpling Guide which covers all aspects of this culinary art that I’m a huge fan of (Let me know if you have questions that I haven’t answered in my posts). Here are quick links to some of my dumpling recipes:
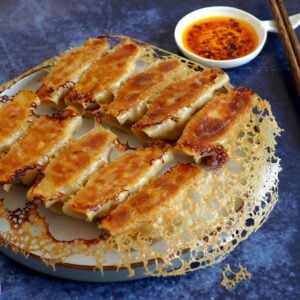
Chicken potstickers with a crispy skirt (鸡肉锅贴)

Video
Ingredients
For the wrappers
- 250 g all-purpose flour, see note 1
- 70 g boiling water
- 60 g tap water
For the filling
- 300 g minced chicken, or turkey
- 100 g canned sweetcorn
- 50 g carrot, grated
- 3 shiitake mushrooms, finely chopped, fresh or rehydrated dried ones
- 2 stalks scallions, finely chopped
- 1 teaspoon minced ginger
- 1 teaspoon light soy sauce
- 1 teaspoon oyster sauce
- 1 teaspoon sesame oil
- 1 pinch ground Sichuan pepper, or five-spice powder, white pepper
- 1 teaspoon salt
For the slurry (for frying 10 at a time)
- 1 teaspoon cornstarch
- ½ teaspoon all-purpose flour
- 100 g water
- ¼ teaspoon vinegar
For frying
- cooking oil
Instructions
Make the dough (See note 2)
- In a mixing bowl, gradually add hot water to the flour. Mix with chopsticks/spatula.
- Then add tap water. Combine and roughly knead into a dough.
- Leave to rest (covered) for 10 minutes then knead again until very smooth.
- Cover and rest for a further 30-60 minutes until it becomes soft.
Mix the filling
- Add all the ingredients for the filling into a mixing bowl.
- For an even distribution of ingredients, use your hand to rub and mix (wear a food-prep disposable glove if you wish).
Roll the wrappers
- Divide the dough into three parts.
- Roll one part into a rope then cut into 10 equal sections (cover the rest to prevent them from drying out).
- Press each piece into a small disc with the palm of your hand.
Assemble the potstickers
- Place a spoonful of the filling in the middle of a wrapper.
- Fold the wrapper into a half-moon shape.
- Pinch and seal the potsticker along the edge while leaving the two corners open.
- Repeat to finish the rest. Remember to lightly flour the surface on which you place the assembled potstickers.
Mix the slurry
- Mix all the ingredients for the slurry until well combined (no lumps can be seen). Set aside.
Fry the potstickers (see note 4)
- Place a frying pan over high heat. Pour in oil (about 1 tbsp for every 10 potstickers). Then add the potstickers.
- When the bottom of the potstickers turns golden, pour in the slurry (stir well beforehand) then cover with a lid.
- Leave to fry (remain high heat). Uncover when most of the water evaporates.
- Continue for 30 seconds or so until the skirt looks dry and crispy (do not burn though).
- Use a serving plate to cover the potstickers. Turn the frying pan upside down to transfer the potstickers onto the plate (the crispy part facing up). Serving warm with homemade chilli oil or a dipping sauce.
Freeze uncooked potstickers
- Place assembled, uncooked potstickers on a tray lined with parchment paper (or dusted with flour). Put into the freezer.
- When completely frozen, transfer them into an airtight plastic bag/container. Use within three months.
Cook frozen potstickers
- Without defrosting, pan fry the frozen potstickers following the same instructions above. Make sure you increase the quantity of the slurry by 50%.
Notes
Your Recipe Notes
Nutrition information is automatically calculated, so should only be used as an approximation.


My daughter loves pot-stickers, but is recently diagnosed Celiac. Do you have any suggestions for a gluten-free dough? Or should just using the 1-1 replacement flour work.
I don’t think a 1:1 gluten-free flour replacement would work for this recipe. Instead, you can try Har Gow–style dumpling wrappers, which use a mix of starches. Just be sure to check that the wheat starch is certified gluten-free, as some brands may still contain trace amounts of gluten. Hope this helps!
I am VERY grateful for your easy-to-navigate range of recipes that include techniques and tips. The human-speak approach of defining the dish, why different techniques and ingredients matter and THEN listing the ingredients and process really appealed to my very amateurish distaste for cooking. Don’t get me wrong; I can cook, I turn out amazing dishes, but I lack the passion that makes working in the kitchen a joy. Unfortunately for me, I often have a craving for food that are sometimes not affordable to buy. Dumplings heads that list – until tonight. Thank you!
I love that I was able to reassure myself about your dough and cooking instructions for potstickers and steamed dumplings by switching between user-friendly tabs in my browser. The “10 ways to fold” video was particularly useful. I added a review to that recipe tab to make it more relevant and succinct.
The recipes weren’t exactly clear about how many dumplings I could make but I took an educated guess at 24, assembled in batches of 6, (12 fried, 12 steamed) and am very pleased that worked out beaUtifully.
The only hiccup was that I decided to do “plain” potstickers for my first attempt; a basic run before I branched out into the awesomeness of lacy potstickers. The amount of water – not slurry – wasn’t immediately clear, so I had to bully Google a bit. Turns out that 100ml of water was enough to start BUT the ‘steam’ process needed to last at least 7 minutes. So for me, with my loose lid, that meant at least 2 more top-ups of 50ml each before I went back into fry mode.
The entire pan of 12 potstickers was cooked within 15 minutes of putting them in, including cooling-down time.
The rest of the recipe is legendary. The dumplings were cooked through and the crispy bottom with chewy tops was sublime. We did not have any leftovers.
I do not think I will ever suffer from painful cravings for potstickers again. Thank you.
Quite frankly, this recipe is superb.
Thank you so much, Roszarie, for leaving such a detailed feedback. I’m delighted you enjoyed cooking and eating these potstickers.
I see that recipe for the dough in this different from the other hot water recipe.please let me know what is the difference between them.
Thanks
Hi Jessie. I’m not sure which “other hot water recipe” you’re talking about. The hot and cold water doesn’t have a set ratio. The general rule is that the more hot water you use, the softer, less chewy the wrappers will be. Hope this helps.
You have another recipe for hot water dough. If water is 300ml .to use 2/3
Hot water .1/3 tap water.is that correct . I can this for
Pot stickers.
Pl let me know
For hot water dumpling dough, you can adjust the hot water to tap water ratio between 1:1 and 2:1, depending on the texture you prefer. Using a 2:1 ratio, with two-thirds hot water and one-third tap water (which would be 200 ml hot water and 100 ml tap water for 300 ml total), will produce a softer, less chewy texture that is especially good for steamed dumplings. This dough can also be used for potstickers if you prefer a tender texture. Hope this helps and happy cooking, Jessie.
Thank you for sharing this recipe, it was fun to make, love the taste. Will definitely make it again. Early best wishes for the Lunar New Year.
Happy Lunar New Year to you too David!
The chicken pot stickers were a big hit. Went through 3 batches, next time they want to make them with me. They liked the combination of chicken, corn and mushroom. I am enjoying your recipes and instructions. Also made 2 batches of seafood pot stickers with shrimp & squid. Used different folding method so my guests would know which was which. Enjoyed your session on different folding methods, it was a great help.
I shared your Red House Spice web site with them.
So happy to hear that David! I also use different folding patterns to differentiate various fillings. Very handy indeed!
I made this for lunch. Rolling out the dough takes a bit more practice, not all the dumplings were the same size. But it tasted fantastic. I will definitely be making this more often.
Glad you’ve enjoyed! I’m sure you’ll master the wrapper skill soon!
Amazing!! Still chewing on my last bite as I post this.
The instructions were spot on and accompanying video very helpful. Husband very impressed.
That’s great Vasiliki! Very happy to know you find my recipe helpful.